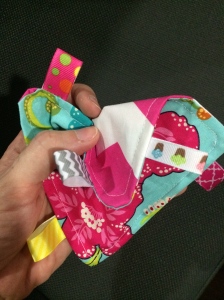
Since I’m using this blog to document my sewing progress in learning to sew by sewing, I have some retro-entries to take care of. The first item that got me sewing was a crinkle tag toy for my babies. (Crinkle tag toy is on its own a flat sandwich of fabric with material inside that makes a delightful crinkling sound when grabbed by babies. They usually have bits of ribbon etc hanging out the sides, as despite you having a variety of toys, sometimes they are only interested in the tags on the toys!) We only had one crinkle tag toy that came with a baby play gym and they both LOVED it, and would fight over it. It seemed silly to me to buy a crinkle tag toy since it seemed so simple. I even made a small tutorial about it on Snapguide because I was so excited at how easy it was.
Lessons learned this project:
Basic understanding of the sewing machine–which can be learned from reading the manual that came with the machine (can be found online).
Understanding right-side of fabric and how to layer items to make it look right when it is finished. Turning something right side out and topstitching.
I also learned the importance of pin placement…its best if they are arranged so they are easily removed when/after sewing and so they don’t get in the way, i.e. not on the inside or bottom.
My next project didn’t stray far from the first. I made beanbags. I used the same squares cut for the crinkle toy, but sewed a square leaving a gap open on one side (never leave the gap open on a corner!). Be sure to iron open your seams as it will make it easier to have a crease to go by when sewing the opening closed. I learned how to do a slipstitch, also seems to be called a blind stitch or ladder stitch. I think they are all slightly different but the same basic technique. I can’t remember what website or youtube video finally helped me understand, but here is a good one from Professor Pincushion. The beanbags were filled with random dried goods from my pantry–rice, lentils, couscous, and of course, beans! Using one kind of dried item per bag makes them each act and feel different which seem to hold interest for the girls. I added scent to different bags for an extra sensory experience though I don’t think they noticed.
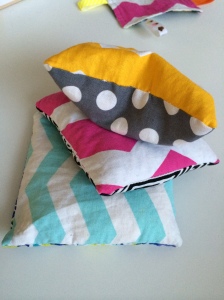
I steal borrow these for pattern weights.


